Making tutorials for my students and other colleagues is a daily activity as a teacher. I already use Snagit program that helps me to capture my screen, add my annotations, and then save it as an image file. For many years, it works well with me. However, one needs more. That's why I share with you a free screenshot tool from Microsoft called Snip with many other fabulous features.
Google Sites is a fantastic platform that helps you to create fabulous customized websites in a short time. It also enables you to invite other people to collaborate and leave comments. However, when it comes to viewers and visitors, it provides users nothing. Public can only view the website and leave without saying anything.
That is why I decided to find a way which can be integrated in Google Sites.The two resources below helped me a lot to embed a discussion forum easily and let the conversation go on my site:
Learning English as a foreign language is not an easy job. I always try to motivate my students intrinsically by providing them a variety of opportunities to use their English inside and outside classroom, but it is not the only type. I also motivate my students extrinsically by giving them extra marks, presents, or certificates. This is very great for the traditional learning environment.
What about the online classes?
In this semester, I'm working with my students on a blogging project and it doesn't work without an extrinsic encouragement. That's why I thought of creating some badges. I tried to find a way to embed a system that generates badges automatically for free, but in vain. After searching, I found an online website that allowed me to create badges, hearts, and ribbons as well.
My students badly needed a way to get my instant help when blogging for the first time. I just wanted to put all things together in the class blog to make this experience easier and more interesting. I spent a lot of time trying some tools for live chatting, but unfortunately most of them need accounts. Of course, this is a kind of headache when it comes to signing up for many websites to do a certain task. Then, I found ChatButton. It is a free and easy-to-install chatbox for use anywhere.
I'm working on a blogging project with my first-year high school students. During this experience, there are a lot of things that I have to learn. As a sharing fan, I decided to write a series of posts to document every skill I acquired and every tool I explored to accomplish the aims of this project and meet my students' needs. Among many things that my students need is a way to find the meaning of the new words that they encounter in the required tasks. I thought of some ways like linking the class blog to an online dictionary, and embedding a Bing or Google widget to translate the whole site, but they didn't work well with my students.
Picassohead is a lovely digital tool that allows users to create their own masterpieces using famous features drawn by Picasso. Teachers can use such an amazing website to unleash their students' creativity and bring the magic of arts into their classes.
Blabberize is a web 2.0 tool that allows users to upload a picture, draw a "mouth" on that picture, and then record or upload a sound clip to make it speak or sing along with the sound.
Thanks to Kaushalya Mandaliya, I managed to embed a live chatroom on my blog. You can create your own using TLK.io[talk·eeo]. It is a web chat that is open to anyone
and channels are owner-free. It seems so easy to use and embed into websites and blogs. I love to use it with my students.They always need instant feedback when working on new projects. However, the public feature is not secure. Anyone can join the discussion and write their messages. The only way to create a little bit private chatrooms is to choose complex names using numbers, letters and character, so spammers can't see them easily. This tool is a little bit new and of course they will add more features in the future. Let's wait and hope!
As I said in my boo above, Audioboo is a free tool that allows users to create podcasts or audio files up to 3 minutes in length using the website directly or the mobile app. There are a lot of features that make me choose this tool to use with my students:
I'm working on a new blog for my students. I'd prefer to build it from scratch. That's why I search for some tools and codes to add more features and touches. I always choose free and simple tools, so students can use them easily without any problems. Cool Text is one of these tools that helped me create a simple, but an impressive logo. It is a FREE graphics generator for web pages and anywhere else you need a logo without a lot of design work.
Please follow these simple steps below to create your first logo:
Thanks to Hafeez Khan, I managed to disable RIGHT CLICK feature to protect my blog content today. I'm so sorry to use this trick. But, you know it is so annoying to find your work copied somewhere without your permission or referring to your name. If you want to prevent others from copying and pasting your work, please follow the steps below:
One of the most beneficial strategies that our moderators have used during M4T workshop is Scaffolding. They were available all the time answering questions and solving problems. Video Tutorials are one tool through which they gave us a hand by voice and picture. As I said in a previous post, the expected teacher in the few years coming will be YOUTUBE Videos not a person. Now, I can learn to do anything with the help of some videos. I don't need to take face-to-face courses any more. That's why I thought to collect all the tutorials that were created by our moderators in this workshop. This will help others with the same interest.
How to Create an account and log into
M4T EVO2012 Session
Email Notifications Can Be Stopped
with One Click
How to Add your Skype ID
Resources, Activities and the Course
Sandbox
Moodle Buddy Groups on Profile
How to Contact your Moodle Buddy
Moodle Sandbox
During the 5 weeks of this session, there were other tools that our moderators used. One of them was WiZIQ. WiZIQ offers a rich set of intuitive tools for online teaching. You can teach courses live and online in their Virtual Classroom. You can also join their vast network of teachers and learners for free. Third, you have the chance to integrate the WiZIQ virtual classroom with your websites.
These are the M4T EVO 2012 Workshop's tutorials and live classes that helped me a lot to be on the right track during these 5 weeks. As I said before, Moodle has a variety of features that can suit all my students' learning styles and multiple intelligences. I think that it's time to integrate such wonderful tool in our EFL classrooms. I will try it and share the results with you here.
I have a last word to you my dear moderators and colleagues. I just want to send a big THANK YOU to everyone of you for your support, help and collaboration. I never forget these happy moments. Really, it is my first real collaboration with a colleague. I liked all the experience in spite of the problems concerning the different time zones and my low internet connection. We can try it again and again. See you @ EVO 2013.
I just wanted to collect my PLNs and all what I created and tried on the web. I have already my own blogs, glogs, wikis and my delicious page .... I can put them there. Oh! No. My mind thinks about something else that I saw 5 weeks ago, but I didn't care a lot about it. Carla Arena, our Digital Tools e-course's moderator, created one for us during EVO 2012 experience. It is Scoop.it. Let's know something about it.
Scoop.it!
Scoop.it is a curation tool that enables you to create magazines and newsletters. It can help you track a topic of your choice and interest.
As you see, you don't need anything to begin curating. You can be a magazine editor in 5 minutes. Other people can suggest related articles, news, experiences ... for you, follow and share your topics. Here is a screenshot of my first curated page collecting all my products:
Click "Create" a topic and complete the title, description, language, and key words.
Click "Upload" to upload a photo for your topic, if you wish.
Click "Go" to move to the next step.
Here is a screenshot explaining these steps:
In the second step, drag and drop the Scoop.it Button to your bookmark toolbar, then click "Next". Here is a screenshot of what you are going to do:
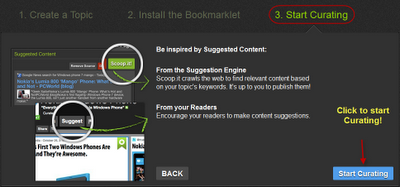
In the third step, click Start Curating Button to start your magazine.
By clicking the Start Curating Button, you have 4 options.
The first option is to accept the posts suggested by the suggestion engine.On your Curate page, click on the green Scoop.it button at the top of each suggested content to add it to your topic.
The second optionis to click "New Post"and paste the URL in the blank field or click the button "Write a post without URL" as shown in the first screenshot below. Then, complete the title, description, upload an image and click post to add it in your curated page.
URL Option
Write a Post without URL Option
The third option is to grab the content while navigating the web.When you are reading an article, website, a blog post or whatever is related to your topic, just click the "Scoop.it" Button on your bookmark toolbar. A window will open on your right of the page you are surfing. The title will automatically appear and you can write a description. If you don't like the image that appears with the content, you can upload your own by clicking "Upload your own Image". The screenshot below will clarify this option:
The fourth option is to accept content suggested by other users. Other Scoop.it users, as well as visitors of your topics, can suggest content to your topics (by using the “Suggest” button in your topic tool bar – this button replaces the “New Post” button for visitors) or by using the bookmarklet themselves (the bookmarklet indeed allows to add content to your own topics or to suggest content to topics you follow). Content suggested by users will appear in your list of suggested content, on top of content suggested by the engine. You can decide to accept them by clicking on the green Scoop.it button or not (click on the red Discard button).
By doing these steps, you can create your first magazine. Each curated includes some tools and features so you can work on it later. From left to right, you can force to top, edit, tag, delete, +1, react, share, and rescoop. Really, it is a very easy and interesting tool. It deserves a TRY!
Here are some videos that can help you to start Curating
Customization
Edit a Topic
Manage Sources
Sharing Options
Export Curation
Domain Hosting
Analytics
The question that arises now ... how to use such innovative tool in teaching?
Some ideas are:
Students can collect their products throughout a project.
Students can use it as an e-portfolio in which they can put their achievements, feedback, certificates, awards, ... during their school year.
Students can read about some topics that the teacher specifies and write summaries for them. They can write a summary and insert an image with the title of each article.
Teachers can use it a space where they can put the materials of their teaching.
Waiting for other suggestions from you to add them to this list!
As a teacher I can embed the glogs that I ask students to create in our class blog. The way to do this is very easy. After creating your glog by Glogster as I mentioned in the previous post, please follow these steps:
1. Scroll down to the end of the page. You will find the following box with a variety of features.
2. Click "Embed into your page".
3. Highlight the link and copy it.
4. Open your blog and create a new post. 5. Click "Edit HTML" Tab and paste the link you have copied. 6. Click "Compose" Tab to view your glog or complete your post. 7. Once you finish, click "Publish Post".
8. When you view your post, you will find your glog a little bit larger. You can make it smaller .by following the step below.
9. When you paste the link you have copied earlier in the "Edit HTML" window, please notice three things (Scale, Width & Height). You can change these values to make your glog smaller. For example:
Scale: 50
Width: 480
Height: 650
Try these steps. If there is any problem, please let me know!
During my wiki project, I wanted to make a poster including the work team photos, goal of the project, the tasks required and and my students' voices. Then, I remembered a tool that I have learned about it in one of EVO2011 courses. This tool is called Glogster. Let's know more about it.
What is a Glogster?
It an online tool that allows you to create digital, interactive posters. These posters incorporate text, audio, graphics and video. Here is the the glog that I have created during my wiki project:
How to use Glogster in the classroom?
Instead of using powerpoint to present your lecture- try using glogster! You can include text and images that relate to the material. You can link to additional web resources. It’s an easy, clean way to present information to students. When you finish lecturing, the glogs can be posted online for the students to refer back to later to study for the test.
Glogs can also be used as part of a webquest activity. Teachers can link to websites that contain valuable information. Videos and graphics can be embedded right into the glog so the information is neatly in one place. These webquests are easy to create and the students will have fun exploring the glog.
Students will also love to create their own glogs! Instead of printing our pictures and messing with scissors and glue, images and video can be added right to their glogs. They can express an event in history, a science concept, characters in a story, or math concepts. The value they will get out of the project will depend on the assignment they are given. Assignment should be structured so that they are providing valuable information, but can also use they creativity and express themselves!
How to Create a Poster on Glogster?
It is so easy to create your first glog. Please follow these instuctions and videos and you can do it in ten minutes:
Go to Glogster.com and set up your account. The first screen you will see is your dashboard. Choose the "Create a new Glog" button.
Select "Wall" from the magnet toolbar that sits on top of your Glog to the left. This changes the background art on your poster. There are several genres from which to choose, ranging from emo to goth to hippie.
Select "Images" from the magnet toolbar. Choose a picture from your computer and upload it. Glogster also allows you to link to online media or using the Grab feature, Glogster will initialize the camera or video equipment on your computer to create new media.
Position your photo by dragging it to the desired location within your Glog. A new toolbar will now appear, allowing you to add special effects, frames and experiment with color work.
Add graphics to your Glog by selecting the button on the toolbar. Hundreds of themed graphic and animated images are available as stock options in Glogster. Simply drag and drop them where appropriate.
Add text by selecting the button on your magnet toolbar. This will open a box allowing you to choose a text frame. Drag and drop it at the location you desire. Select Edit on the new toolbar that is found near the top of the frame. You will now be able to type in your text, change the font style and size, and use other special effects.
Add video and sound in the same way as the other features. Select the appropriate feature from the toolbar. Select upload, link or grab. Add special effects.
Continue adding images and other effect to create your Glog. Glogster has thousands of examples available from which to draw inspiration. Once you are pleased with your Glog, select the preview button and finally the publish button.
Glogster in 90 seconds
Adding Wall
Adding Text
Adding Graphics
Adding Sounds
Adding Videos
Adding Links
Examples of Educational Glogs:
Here are some glogs created by other teachers. You can use them with your students or consider them as a model for you:
By using this tool, I think that teachers can integrate all language skills in a way that make students feel very happy. This tool allows students to play with colors, texts, sounds and videos. Of course, this is what students need. Try it and find the difference.
Sometimes I feel myself as my students. I need some activities full of fun and enjoyment. The last week was a little bit tough, but this week began with a delicious task. At the beginning of this week, one of my colleagues asked me about how to use “delicious”. To be honest, this is not the first time to hear about it. I know it is one of the web 2.0 tools, but I don’t think about making use of it. Surfing the internet, I found that http://delicious.com/ is a social bookmarking site where you can save all of your bookmarks or favorites in one place. This permits you to access the same bookmarks on any computer at any location.
What else can delicious enable you?
It enables you to bookmark links you want to return to.
It enables you to share links with people who have common interests. By sharing links through del.icio.us rather than by sending links in an email, users are providing access to current and future links they may add to their del.icio.us accounts. Users can mark links as private so that visitors to their del.icio.us site will not see them. del.icio.us also allows users to share content directly through certain tags.
Tags are one word descriptions assigned to bookmarks by the user. They are not hierarchical. The use of tags rather than folders in organizing the content has several
implications for del.icio.us users. First, users can invent their own tags. This allows users not only to tag resources based on content, but also based on what they want to do with content. For example, you might tag a resources as to_read if you want to read it later. Tags also make your bookmarks at del.icio.us searchable. Users can assign as many tags to a bookmark as they want.
Some colleagues pointed out that one of the disadvantage of delicious is not having folders. However, I think we can consider tags as our online folders, If we create a little bit broad tags. I like the idea of adapting everything we have and not to restrict to a certain format.
Another benefit of del.icio.us is the ability to view information from other del.icio.us users. When a user bookmarks a site on del.icio.us, they can see how many other people have saved that content. They are also able to see the usernames of those who have tagged the content, allowing them to find people with similar interests. In addition, users can search del.icio.us using tags to find other peer recommended links.
Is it difficult to use it?
As one of the web 2.0 tools, it is very easy to use. You don’t need even instructions to do this. You need just to explore it: http://delicious.com/azharyoussef. As you know I don’t depend on my experience or exploration of new task only, but also I do search for more information about it. In addition to my dear instructor Deborah, I’ve read a lot of articles and watched some videos of how to use delicious effectively. Here is one of the videos that opened many windows on this delicious world:
Viewing this video, you will find it is very easy to create your account:
Follow the instructions in order to set up an account.
After you have registered for your account, you will be taken to a page allowing you to install the del.icio.us buttons on your browser. These buttons will allow you to navigate and save bookmarks to your del.icio.us page in a an easy way.
If you wish to install these buttons, select “Install Buttons Now”.
Save the delicious.msi installer to your desktop.
After the installer has completely downloaded, close all open Internet Explorer windows.
Double-click to run the delicious.msi installer and select Run.
Once the installation is done, a new browser window will automatically open to your del.icio.us account.
As soon as you create your account, you will feel how delicious the delicious website is. You can make many things: you can add a new bookmark and send it to your friends at the same time, add a new user to your network and benefit from his/her bookmarks, create tags to collect similar sites, read and save other people’s websites, …. etc. Although it is a magic tool, I think it is not of great value for my pre-intermediate students. They can benefit from it indirectly. I mean through me as a teacher. I can share and save valuable sites, then visit them to print and download suitable files for my students. This tool is suitable for advanced students as they need to know other people of the same interests and make friends around the world.
As you see this tool is very valuable for teachers. I’m not going to repeat my self, but everyone of us should have a delicious account not just to save our favorites but also to check others’ favorites and choose people of the same interest. This will extend our friends base and gain more experiences. I recognize all these benefits when I use it this week. My colleagues’ delicious pages are full of treasures that it is very difficult to get them alone. Thanks so much my dear colleagues for your valuable websites and thanks my dear instructor Deborah for this task that helps me to discover two worlds one inside me and the other around me.

 Making tutorials for my students and other colleagues is a daily activity as a teacher. I already use Snagit program that helps me to capture my screen, add my annotations, and then save it as an image file. For many years, it works well with me. However, one needs more. That's why I share with you a free screenshot tool from Microsoft called Snip with many other fabulous features.