Sunday, February 19, 2012

Just ... Scoop.it!


I just wanted to collect my PLNs and all what I created and tried on the web. I have already my own blogs, glogs, wikis and my delicious page .... I can put them there. Oh! No.  My mind thinks about something else that I saw 5 weeks ago, but I didn't care a lot about it. Carla Arena, our Digital Tools e-course's moderator, created one for us during EVO 2012 experience. It is Scoop.it. Let's know something about it.

Scoop.it! 

Scoop.it is a curation tool that enables you to create magazines and newsletters. It can help you track a topic of your choice and interest. 


As you see, you don't need anything to begin curating. You can be a magazine editor in 5 minutes. Other people can suggest related articles, news, experiences ... for you, follow and share your topics. Here is a screenshot of my first curated page collecting all my products:


Steps to create your curated page:
  • Sign up to create a free account.
  • Click "Create" a topic and complete the title, description, language, and key words.
  • Click "Upload" to upload a photo for your topic, if you wish. 
  • Click "Go" to move to the next step. 
  • Here is a screenshot explaining these steps:


  • In the second step, drag and drop the Scoop.it Button to your bookmark toolbar, then click "Next". Here is a screenshot of what you are going to do: 


  • In the third step, click Start Curating Button to start your magazine.
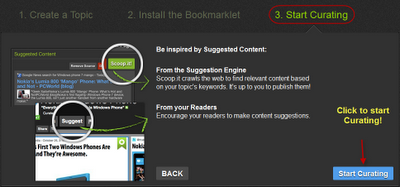
 

  • By clicking the Start Curating Button, you have 4 options.
  • The first option is to accept the posts suggested by the suggestion engine. On your Curate page, click on the green Scoop.it button at the top of each suggested content to add it to your topic.


  • The second option is to click "New Post" and paste the URL in the blank field or click the button "Write a post without URL"  as shown in the first screenshot below. Then, complete the title, description, upload an image and click post to add it in your curated page. 

URL Option


Write a Post without URL Option


  • The third option is to grab the content while navigating the web.When you are reading an article, website, a blog post or whatever is related to your topic, just click the "Scoop.it" Button on your bookmark toolbar. A window will open on your right of the page you are surfing. The title will automatically appear and you can write a description. If you don't like the image that appears with the content, you can upload your own by clicking "Upload your own Image". The screenshot below will clarify this option:

  • The fourth option is to accept content suggested by other users. Other Scoop.it users, as well as visitors of your topics, can suggest content to your topics (by using the “Suggest” button in your topic tool bar – this button replaces the “New Post” button for visitors) or by using the bookmarklet themselves (the bookmarklet indeed allows to add content to your own topics or to suggest content to topics you follow). Content suggested by users will appear in your list of suggested content, on top of content suggested by the engine. You can decide to accept them by clicking on the green Scoop.it button or not (click on the red Discard button). 
  • By doing these steps, you can create your first magazine. Each curated includes some tools and features so you can work on it later. From left to right, you can force to top, edit, tag, delete, +1, react, share, and rescoop. Really, it is a very easy and interesting tool. It deserves a TRY! 

Here are some videos that can help you to start Curating

Customization


Edit a Topic


Manage Sources


Sharing Options


Export Curation


Domain Hosting


Analytics


The question that arises now ... how to use such innovative tool in teaching?
Some ideas are:
  1. Students can collect their products throughout a project.
  2. Students can use it as an e-portfolio in which they can put their achievements, feedback, certificates, awards, ... during their school year.
  3. Students can read about some topics that the teacher specifies and write summaries for them. They can write a summary and insert an image with the title of each article.
  4. Teachers can use it a space where they can put the materials of their teaching.
Waiting for other suggestions from you to add them to this list!


Resources:
  • For more information, please visit this link

Thursday, February 16, 2012

Lesson Plan: When Ends Change


One of the most wonderful experiences that I have gained during these precious weeks is to make use of these tools in our curriculum. It takes time to devise a lesson plan that adapts one or two ideas or tools. However, I feel so happy to achieve this aim. The current plan will adapt another lesson plan created by Haley Fishburn Moore. I liked its idea very much. How would the story have changed if Romeo had received the letter? It can develop my students' creativity, critical thinking skills and how to look at things from different perspectives. This treasure includes not just a great idea, but a variety of amazing tools that help students to analyze and understand novels and plays. Among these tools are Story Map, Drama Map, Timeline, Plot Diagram, Venn Diagram, Comic Creator, and Stapleless Book. In addition to the printout materials, e.g., Plot Tree Worksheet, Ideas for "Happily Ever After" Presentations, Group Assessment, and Grading Rubric.


I will use the same idea, but with the use of other tools that we used during Week 5, e.g., Bighugelabs, and epubbud. In English textbooks for Egyptian secondary schools, there are a lot of narratives included. I will choose one of them and try to adapt Haley's lesson plan.

Title
The Pearl - A Story of Greed


Materials Needed:
  1. Computers 
  2. Internet access
  3. The Pearl: A Story of Greed  (Copied by Me using epubbud)
  4. Plot Tree Worksheet  
  5. Grading Rubric
  6. Group Assessment
  7. Blank sheets & pencils
Digital Tools:
 
  1. Story Map
  2. Bighugelabs 
  3. epubbud
Class Level:
  • 12th Grade (Between 18 - 19 years old) advanced students.
Time Frame:
  • Two 50-minute classes
Lesson Objectives:
 
By the end of this lesson, students will:
  • read a story to get the main idea and the moral lesson behind it.
  • analyze a story ( ... characters, setting, conflict, and resolution) using Story Map Tool.
  •  determine a turning point of a story.
  •  write a new happy end.  
  •  use Bighugelabs to create a cover to the new story.
  •  use epubbud to create the story using the new end.
  • share e-stories in their edmodo group. 
Steps:

  1. Divide the class into groups of three.
  2. Ask them to read the story (The Pearl: A Story of Greed) in their textbooks or read it online as I typed it using epubbud. The aim of the first reading is to get the main idea and the moral lesson behind it.
  3. Tell the students that they are going to read the story again to analyze its elements, e.g, characters, setting, plot, conflict, and resolution using Story Map Tool.
  4. Once they finish the analysis, ask them to print their products and share with their colleagues.
  5.  Using Plot Tree Worksheet, ask the students to determine a turning point of a story (e.g., Kino agrees to throw the Pearl away ..... ) and think of another happy end.
  6.  Ask them to work into groups and write their first draft using a blank sheet putting in mind the Grading Rubric criteria.
  7. After finishing their first draft, tell them to use Bighugelabs to create a cover to the new story and save it on their computer.
  8. Then, ask them to start creating their stories with the new ends using epubbud
  9. Once they finish their stories, ask the groups to share their e-stories in their edmodo class and give feedback to each other.
  10. Ask the students to complete the Group Assessment to check what they have done and how other group's members work and cooperate while working together.
  11. Using edmodo, create a Poll so students can vote for the most wonderful e-story. Then, create badges for the Top 5 Winning groups.
I'm sure that my students will create amazing e-stories with different ends. Of course, there are other tools involved in the lesson plan created by Haley Fishburn Moore. However, I don't want to overwhelm my students with such variety. I think that two or three are enough in a lesson. This will help students focus more on the content not only the form. 


This is the last task of Digital Tools with Purpose in the Classroom e-course, but it is the first step towards my new journey. I feel that I have a big bag full of tools, experiences and more chances to innovate and create. I think that you will hear about another revolution in Egypt in the coming weeks .... but in Azhar's Classes. I will try to pick up what is suitable for my students' levels and learning styles. Last year, I amazed my students using wikis. This year will be more productive, interesting and excising. Really, I can't find words to thank all people responsible for such amazing chances to learn. You changed my life to a great extent. Now, I'm interested in everything new in the field of teaching English as a foreign language. I can't stop myself! All the time I search for a new beginning. 

If you are interested in this e-course, here are our session online spaces:
  • Edmodo: main environment, message board for announcements and discussions.
    Group Code: 9m0oq6
  • Our Wiki: syllabus, weekly tasks, weekly discussion threads and tutorials.
  • Our Diigo Group: online social bookmarking space where we keep all the resources being shared by the group.
  • scoop.it visual content aggregation.
  • Recording of EVO Wrap-Up.


Last, but not Least
BIG THANK YOU TO DIGITOOLS COMMUNITY


See you @ EVO 2013

Friday, February 10, 2012

How to Digitalize What you Read?


Many people think of reading as a skill that is taught once in the first few years of school. All what teachers do is just to teach only new vocabulary and concepts relevant to new content. Seen this way, reading is a simple process: readers decode each word in a text and then automatically comprehend the meaning of the words. Do you think … this is the right understanding of reading?

Think for a moment about the last thing you read … an essay, a newspaper analysis, a report, a novel? If you could recapture your mental processing, you would notice that you read with reference to a particular world of knowledge and experience related to the text. The text evoked voices, memories, knowledge, and experiences from other times and places. As experienced readers read, they begin to generate a mental representation, or gist, of the text, which serves as an evolving framework for understanding subsequent parts of the text. As they read further, they test this evolving meaning and monitor their understanding, paying attention to inconsistencies that arise as they interact with the text. If they notice they are losing the meaning as they read, they draw on a variety of strategies to readjust their understandings ... an article about reading by Christine Cziko et al.

Reading, according to this view, is not only knowing some new words and concepts, but also knowing new experiences, cultures and other voices. Students need to adopt some strategies that can help them to learn how to read to make connections and build new perspectives. Week 5 provides me a variety of tools and ways to involve my students in reading texts and novels. Let's know more about how to make your students want to read not just for understanding but also for pleasure!

Objectives of Week 5:

During this week participants will:
  • have an overview of the possibilities for developing learner's reading skills in a digital world
  • discuss what they've acquired for their teaching toolkit and assess their own learning during the session

Tasks of Week 5:

Task 1 Creating Magazine Covers to Summarize Texts

During this task, we read a very great lesson plan. It is a comprehensive plan where you can find objectives, resources, tools and steps. Then, we were asked to choose an article from this link. It is really a very rich link where you can find a variety of articles that can be a guide for your teaching in the 21st century with its numerous requirements. The third step was to choose one of the following tools .. ReadWriteThink interactive tool, Fodey or Bighugelabs to create a magazine cover, news page, or brochure to summarize the article we chose earlier. I took a lot of time and effort to choose an article. All of them are so rich with ideas and thoughts.  At last, I selected an article by "The 21st-Century Digital Learner"


This article talks about involving students in making decisions about their learning. I do this with my students all the time. I listen to their views about their way to learn and what make them involved and like their school. We have to do this, because we talk about the life of a person not a pot. We have to give them a VOICE to tell us what they feel, what they need, and what they want to do. I just want to send this message to all teachers from all over the world .... PLEASE GIVE YOUR STUDENTS A VOICE .... I'M SURE THEY WILL SURPRISE YOU! Here is its cover using Bighugelabs. It is an innovative way to make connections and visualize new concepts. 


Task ... Cool Extra Idea: Publish Your E-book


In this task, we were asked to use Epubbud to publish our e-books. It is a great idea where we can feel ownership by creating our own books and let all people around the world read them and leave comments. By this tool, you will give your students a chance to e-publish themselves and create their own world. While surfing the internet about how to use Epubbud in my teaching, I found a wiki about this tool. It can be a beneficial resource for you to read and create your e-books to enrich your classrooms. For me, I created an e-book about some of the tools that we have explored during our Digital Tools e-course. Here is the link .... Happy Reading!


This is not the last task to do. There is another thing that I have to do before saying Good Bye EVO 2012. The next post will discuss how to use such tools adapting a lesson plan provided by our moderators in my own teaching context.

Sunday, February 5, 2012

Which Button Do I Click?

Task 5: Explore and  
Create

During this week, we explored a variety of tools that help our students' improve their speaking skills, add some confidence to their voices, and feel happy while completing the required tasks. Among them are Audioboo, Voxopop, VokiFotobabble, Tube It, Sketchcast, Blabberize, Showbeyond, Intervue, Knovio, Educreations Recordr ..... and more. During task 5, we were asked to use one of these tools to devise a lesson plan for speaking practice. Actually, I took a lot of time asking "Which Button Do I Click?". Finally, I decided to mix 2 tools at the same time wishing enjoyable time for my dear students. Let's know more about it! 


Please, Humans
Save Our Lives!


Materials Needed:
  1. Computers 
  2. Internet access
  3. Headsets for recording
  4. Webcams
  5. Blank sheets & pencils
Digital Tools:
 
  1. Blabberize
  2. PowerPoint Program
  3. Knovio

Class Level:
  • 11 Grade (Between 17-18 years old) Advanced Level Students

Time Frame:
  • Two 50-minute classes

Lesson Objectives:
By the end of this lesson, students will:
  •  discuss the problems that animals face as a result of humans' acts.
  •  talk about the developments that the humans have done for animals.
  •  make an argument between animals and humans using Blabberize.  
  •  create video presentations using Knovio about animals' problems and suggest solutions.
  •  listen to pairs and groups' products and give feedback.
  •  embed revised products in their class wiki.
Steps:

  1. Divide the class into 2 big groups.
  2. Tell the students that they are going to make an argument. 
  3. The  first big group will play the role of animals. They can work in pairs discussing the problems that animals face as a result of humans' acts. They can use blank papers and pencils to jot down their initial ideas. 
  4. The second big group will play the role of humans that result in animals' problems. They can work in pairs talking about the developments that humans have done for animals.They can use blank papers and pencils to jot down their initial ideas.
  5. Once students finish their discussion together, ask them to use Blabberize to create their Blabbers. It is so easy to use this tool. They can choose a picture (e.g., an animals or equipments) they are going to talk about, add mouth, choose a sound and record or upload an audio.
  6. When students finish their Blabbers, ask them to present their products to other colleagues and give them feedback.
  7. After listening to the argument between animals and humans, ask students to work in groups to choose a certain problem that animals talked about in the first task and suggest some solutions. First, they use the internet to search for information and pictures. Then, they use the PowerPoint program to create their slides.
  8. Once they finish their slides, ask them to use Knovi to upload slides, record a video using their webcam and share their video presentations in the class wiki. Knovio is an innovative tool for turning PowerPoint slides into rich video presentations with just a web browser and webcam. With Knovio, you can take static PowerPoint slides to a new level with video and audio presentations that can be accessed anytime on-demand and shared with others through email and social media.
Really, I enjoyed this week so much exploring and trying these new tools. I'm sure that my students will like them because they enable their voices to be heard and their confidence to be grown. Thanks so much my Dear Moderators for such treasures.


Saturday, February 4, 2012

Bring Life into Your Classes by TalkTools


Week 4 reminds me with a research that I did in my Special Diploma 8 years ago. Our professor asked us to find a problem that our students face while learning the English language as a foreign language. That time, I was a novice teacher for just a year. This means that I have no any expertise with students and the difficulties that may face in their learning process. Thus, I decided to meet those students and talk about their experiences and learning problems. One of the most difficult skills that most of my students talked about is "HOW TO EXPRESS THEMSELVES IN ENGLISH FLUENTLY". 

I never forget one of my students' words, "I want to express my ideas and feelings freely, but what If I made a mistake, what if I didn't  find the word that I need, what if my colleagues laughed at me, what if you didn't say well done ...... ".  Then, I felt that the problem is not my students' way to learn, but my way of teaching. I'm the only blamed person because I couldn't break the ice between my students and the Giant Fear of Speaking. From that time, I began to create a safe environment where students can convey their thoughts and emotions more easily. This is what makes week 4 important for me because it provides me with a variety of tools that help my students to speak and forget about the barrier between their tongues and words. 

Objectives of Week 4:

During this week, participants will:
  • explore online tools to enhance learners' speaking skills
  • have a hands-on activity to learn how to use the tool of their choice
  • share their findings with their peers

Task 1: Learning about Speaking Tools

In this task, we were asked  to watch a video created by Ana to know more about speaking tools that we can use with our students. She differentiated between two kinds of tools: Synchronous and Asynchronous. Here is the video:


According to our moderators, there are a lot of Synchronous and Asynchronous tools. Here are two lists of them:

ASYNCHRONOUS TOOLS:

http://mailvu.com/ (video mail) 
http://www.keek.com/ (post your status in video) 
http://www.aviary.com/tools/myna# (create podcasts) 
http://screenr.com (create screencasts) 

SYNCHRONOUS TOOLS:

http://wiziq.com (platform for online classes) 
http://www.socialhangouts.me/ (online video chat) 
http://trendtok.opentok.com/ (twitter video chat) 
http://www.slideshare.net/zipcast (turn a slideshare pres. into a webinar) 
http://www.hoot.me/ (study with a facebook contact)   

 
Task 2: Video Interview

We were asked to use http://recordr.tv, a site which allows us to record videos with our webcams or with our microphones only. The task is to listen to Ana's 2 questions (Why did you choose to be a teacher? & What do you like most about being a teacher?), then answer them using the same website. Really, I feel so sad because I couldn't use it at all. I tried it out many times, but  there was an error message that appeared after clicking "upload". So, I used another tool that allows us to record our voice and capture the screen at the same time. It is www.screenr.com. Here is my screencast.


Task 3: A Video Questionnaire

intervue.me allows you to create questionnaires and then have students leave video replies. In task 3, we were asked to use this tool to record a video reply answering the question of Ana (How do you celebrate Christmas with your family?). I created an account and created my questionnaire that included just one question "Which tools do you like most in our DigiTools e-course?". However, it didn't work well when I wanted to record a video reply to Ana's question. Again and again, I selected another tool that I regularly used with my students. It is audacity; an audio editor for recording, slicing, and mixing audio.

Task 4: Draw your Family

Two new tools were provided to complete task 4. One of them is Sketchcast that  allows us to record our voices while we draw on a virtual white board. Another alternative is Educreations. It is a site where you can create and share great video lessons with your iPad or browser. I tried Sketchcast, but it didn't work well. I think that there are some missing programs or updates in my laptop. Then, I tried Educreations. Really, it so fantastic and easy to use. Sometimes, I like to play with colors, voices and pictures like my students. That's why I'm so close to their hearts. In 5 minutes, I created my video lesson describing my family. I think that my students will like this tool so much as they like drawing and hearing their voices.

This is not the end of week 4, there are a lot of tools that I have to explore before choosing one or two to create my lesson plan. I know that this will take more time, but I enjoy time with these treasures.